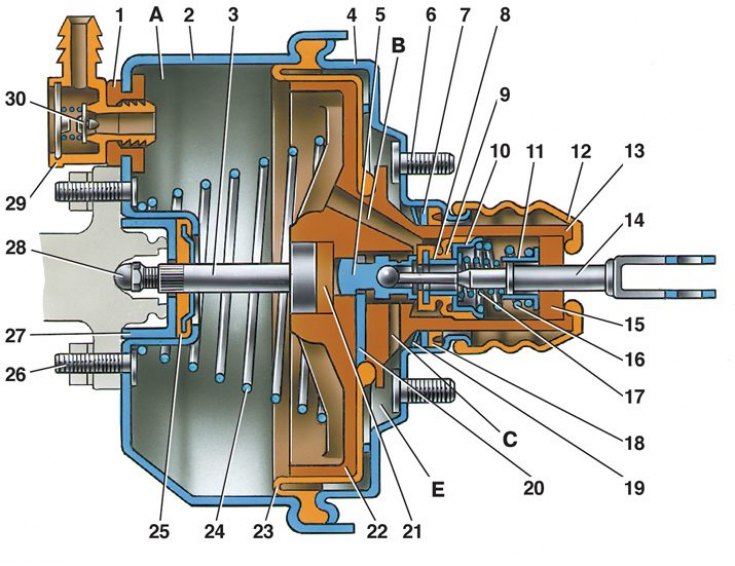
Vacuum booster

1 - flange fastening the tip; 2 - amplifier housing; 3 - stock; 4 - cover; 5 - piston; 6 – a bolt of fastening of the amplifier; 7 - remote ring; 8 – a basic cup of a valve spring; 9 - valve; 10 - valve support cup; 11 - support cup of the return spring; 12 - protective cap; 13 - holder of the protective cap; 14 - pusher; 15 - air filter; 16 - valve return spring; 17 - valve spring; 18 – housing cover seal; 19 – a lock ring of a sealant; 20 - thrust plate; 21 - buffer; 22 - valve body; 23 - diaphragm; 24 - return spring of the valve body; 25 - rod seal; 26 – a bolt of fastening of the main cylinder; 27 – rod seal holder; 28 - adjusting bolt; 29 - hose tip; 30 - valve; A - vacuum cavity; B - channel connecting the vacuum cavity with the internal cavity of the valve; C - channel connecting the internal cavity of the valve with the atmospheric cavity; E - atmospheric cavity
1. Press the brake pedal 5–6 times with the engine off to create the same pressure in cavities A and E, close to atmospheric. At the same time, by the force applied to the pedal, determine if there is any jamming of the valve body 22.
2. Stop the brake pedal in the middle of its travel, start the engine. With a working vacuum booster, the brake pedal after starting the engine should "go ahead".
3. If the pedal "does not move forward", check the fastening of the tip 29, the condition and fastening of the flange 1, the hose to the tip and the engine inlet pipe fitting, since loosening of the fasteners or damage to them sharply reduces the vacuum in cavity A and the efficiency of the amplifier.
4. In the event of spontaneous braking of the car, check the vacuum booster for leaks with the engine running, first with the stationary brake pedal released and then pressed. "Suction" protective cap 12 to the shank of the valve body and the hiss of sucked air indicates insufficient tightness of the amplifier.
5. Even in the absence "suction" of the protective cap, check the condition of the seal 18, for which carefully remove and then slide the protective cap 12 from the flanging of the hole on the cover 4.
6. With the engine running, rock the protruding shank of the valve body with a force of 29.4–39.2 N (3–4 kgf); in this case, there should not be a characteristic hiss of air passing into the amplifier through the seal 18 of the cover.
7. If the vacuum booster is leaking, disconnect the pusher 14 from the brake pedal, remove the protective cap 12 and put 5 g of TsIATIM-221 grease between the seal and the flange of the cover and valve body, then check the condition of the air filter 15, if necessary, replace it and install the protective cap in place.
8. If in this way it is not possible to eliminate air leakage, then it is necessary to replace the vacuum booster.
