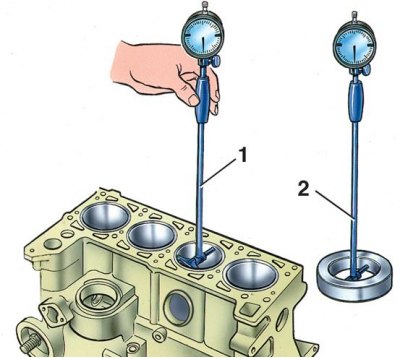
Measuring cylinders with a bore gauge

1 - caliper; 2 - setting the inside gauge to zero according to caliber 67.8125.9501
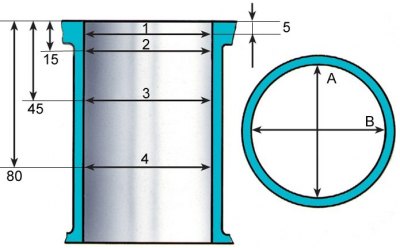
Cylinder measurement scheme

A and B are the directions of measurement; 1, 2, 3, 4 - belt numbers
Check if the wear of the cylinders exceeds the maximum allowable - 0.15 mm.
The cylinder diameter is measured by an inside gauge in four zones, both in the longitudinal and transverse directions of the engine. Caliber 67.8125.9501 is used to set the inside gauge to zero.
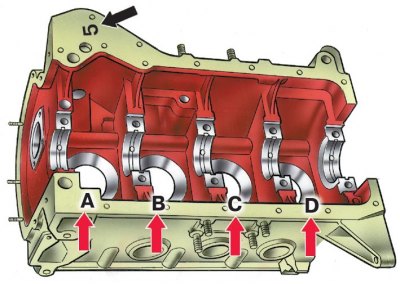
Marking of the size group of cylinders on the block and conditional number of the cylinder block

Red arrows - marking the size group of cylinders on the block.
The black arrow is the marking of the conditional number of the cylinder block.
Attention! The cylinders of the block are divided by diameter in 0.01 mm into five classes: A, B, C, D, E. The class of the cylinder is marked on the lower plane of the block. On the same plane, as well as on the main bearing caps, the conditional number of the cylinder block is stamped, which indicates that the covers belong to this block.
In the belt zone 1, the cylinders practically do not wear out. Therefore, by the difference in measurements in the first and other zones, one can judge the amount of cylinder wear.
If the maximum wear value is greater than 0.15 mm, bore the cylinders to the nearest repair size of the pistons (enlarged by 0.4 or 0.8 mm), leaving an allowance of 0.03 mm for the honing diameter. Then honing the cylinders, maintaining such a diameter that when installing the selected repair piston, the estimated gap between it and the cylinder was 0.05–0.07 mm.
