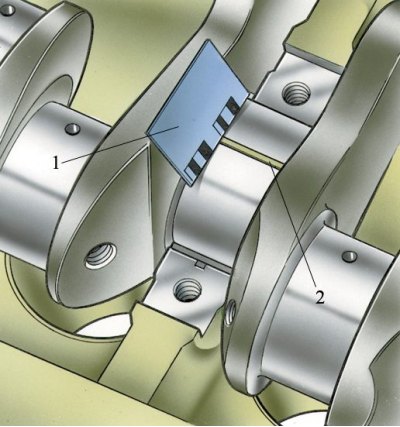
Determination of the gap on the scale

1 - scale; 2 - calibrated wire
Do not perform any adjustment operations on the inserts. In case of scuffing, risks or deviations of the anti-friction layer, replace the liners.
Examination
1. Check the clearance between the liners and the crankshaft journals:
- place a piece of calibrated plastic wire on the neck to be checked;
- install covers with main bearings and tighten the fixing bolts of the covers to a torque of 80.4 Nm (8.2 kgf·m).
2. Remove the covers and determine the amount of gap by the amount of flattening of the wire on the packing scale.
3. The gap between the crankshaft journals and the liners can also be determined by calculation by measuring the diameters of the main journals, the beds for the liners and the thickness of the liners.
4. The nominal design gap is 0.050–0.095 mm. If it is less than the limit (0.15 mm), you can use these earbuds again. If the gap is greater than the limit, replace the liners on these necks with new ones. If the crankshaft journals are worn and ground to repair size, then replace the liners with repair increased thickness (see table. Diameters of connecting rod journals, mm).
Thickness of liners of radical bearings, mm
Rated | enlarged (repair) | |||
0,25 | 0,50 | 0,75 | 1,0 | |
1,824 | 1,949 | 2,074 | 2,199 | 2,324 |
1,831 | 1,956 | 2,081 | 2,206 | 2,331 |
A sign of the correct assembly and mating of the necks with the liners is the free rotation of the crankshaft.
Numbers 0.25; 0.50, etc. indicate the amount of reduction in the diameter of the crankshaft journals after grinding.
