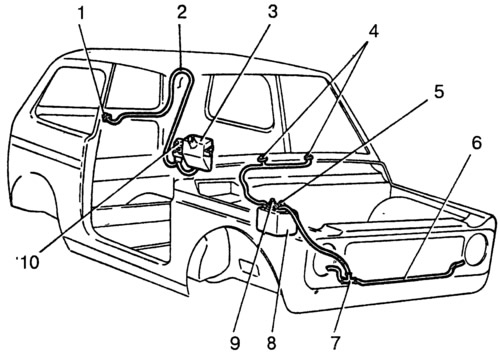
Pic. 8-25. Window washer diagram:
1 - jet washer glass tailgate; 2 - hose from the pump to the jet; 3 - a washer reservoir of glass of a door of a back; 4 - windshield washer jets; 5 - headlight washer pressure pump; 6 - hose to the headlight glass jet; 7 - tee; 8 - reservoir for windshield and headlight washers; 9 - windshield pressure pump; 10 - pressure pump for the tailgate glass washer.
The tailgate glass washer has a separate tank installed in the luggage compartment.
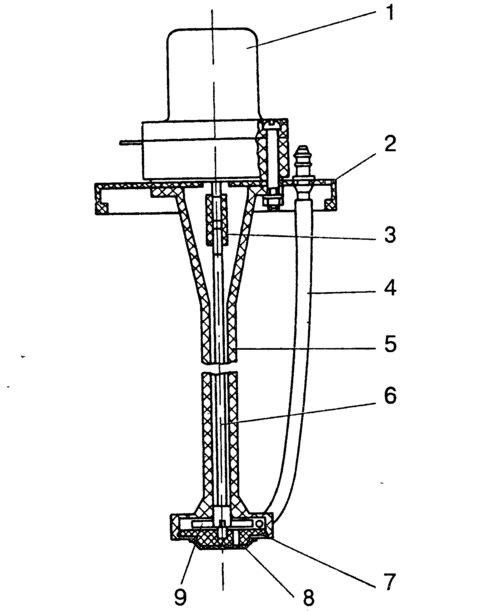
Removal and installation of injection pumps for windshield and headlight washers. Disconnect electrical wires from motor 1 (pic. 8-26) and remove the tube from the pressure pump fitting.

Pic. 8-26. Washer pump:
1 - electric motor; 2 - tank cover; 3 - clutch; 4 - liquid supply tube; 5 - pump casing; 6 - rotor shaft; 7 - rotor shaft support; 8 - bezel with filter mesh; 9 - rotor.
Turn cover 2 with the electric motor counterclockwise and remove the pressure pump from the tank.
Install in reverse order.
Dismantling and assembly of the delivery pump of windshield washers and headlight glasses. Discharge pump and electric motor (pic. 8-26) fastened with screws and nuts to the cover 2.
To disassemble the pump, unscrew the screws, remove the electric motor and cover, disconnect the fluid supply pipe 4.
Prying off the edge of the rim 8, remove it together with the filter mesh.
Remove the clutch 3, then, gently tapping on the shaft 6 of the rotor 9, push out the support 7 and remove the shaft with the rotor.
Reassemble in reverse order.
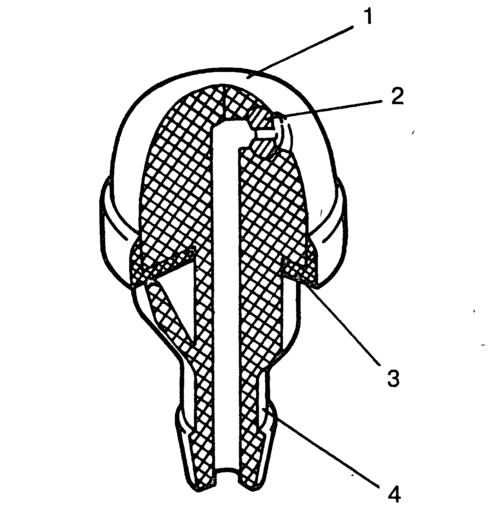
Removal and installation of washer jets. To remove the jet from the side of the engine compartment, slightly squeeze the latches of the plastic housing 1 (pic. 8-27) and, prying it from above with a screwdriver and overcoming resistance, remove the jet assembly with the atomizer.

Pic. 8-27. Windshield and tailgate washer jets:
1 - jet body; 2 - atomizer; 3 - gasket; 4 - fitting.
Disconnect the tube and blow the atomizer 2 and the housing with compressed air.
When installing the jet, insert it sharply with the body into the hole in the body.
Adjust the direction of the liquid jet by changing the position of the atomizer in the housing socket. To do this, insert a needle into the jet sprayer hole and gently turn the sprayer so that the liquid jet hits the required glass area.
