Removal and installation
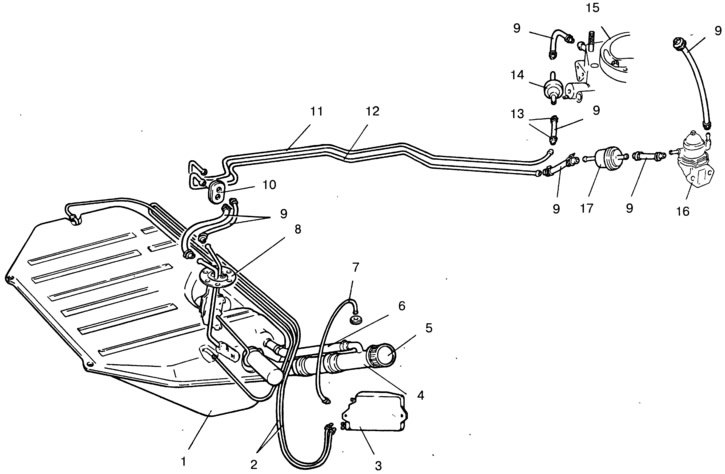
To remove the fuel tank 1 (pic. 2-78) disconnect «mass» battery wire.

Pic. 2-78. Fuel tank parts and fuel lines:
1 - fuel tank; 2 - separator and fuel tank hoses; 3 - separator; 4 - filling pipe; 5 - cork; 6 - hose of the fuel tank and filling pipe; 7 - separator hose and hatch; 8 - fuel level sensor; 9 - connecting hoses; 10 - sealant; 11 - drain fuel line; 12 - fuel line; 13 - hose clamps; 14 - check valve; 15 - carburetor; 16-fuel pump; 17 - fuel fine filter.
Unscrew the cap 5 of the filling pipe 4, remove the maximum possible amount of gasoline.
Remove a back seat, turn out screws of fastening of the right and left upholstery of arches of back wheels and remove upholstery.
Turn out screws of fastening and remove a cover of a compartment of a fuel tank. Disconnect hoses 9 and electrical wires from fuel level sensor 8, as well as hoses 2 from gasoline vapor separator 3.
Turn out bolts of fastening and remove a fuel tank.
Install the fuel tank in reverse order.
Cleaning and control
Remove the fuel level sensor. Flush the tank with gasoline to remove dirt and deposits. Then rinse and steam the tank from gasoline residues with a jet of hot water.
Carefully inspect the fuel tank along the joint line, make sure there are no leaks, if necessary, solder the leak with soft solder.
Warning: Only a well-cleaned fuel tank that does not contain gasoline vapors, which can ignite when soldering, can be soldered.
