Removal and installation
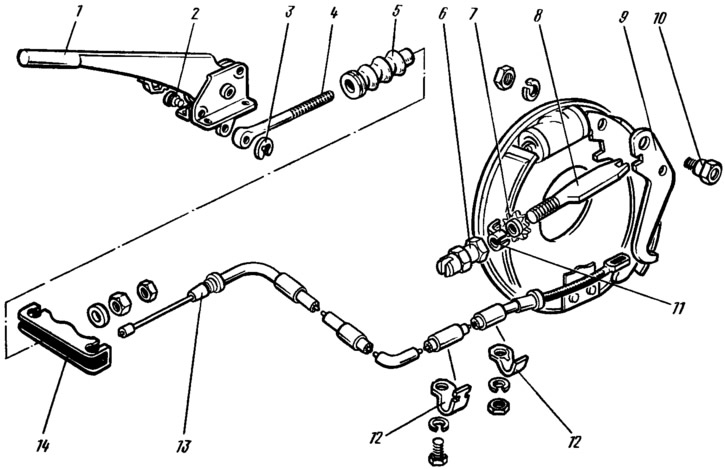
Install lever 1 (pic. 137) to the lowest position, disconnect the ends of the cables 13 from the levers 9 of the manual drive of the shoes and from the equalizer 14, for which they unscrew the lock nut and the adjusting nut from the rod 4, remove the washer and the equalizer 14 and disconnect the brackets 12. Unscrew the nuts securing the lever bracket 1 to the floor of the body and remove it complete with bracket.

Pic. 137. Details of the parking brake drive: 1 - parking brake lever; 2 - finger; 3 - lock washer; 4 - thrust; 5 - protective cover; 6 - pad stop; 7 - adjusting nut; 8 - expansion bar of pads; 9 — the lever of a manual drive of pads; 10 - axis of the lever; 11 - nut retainer; 12 - cable fastening bracket; 13 - cable; 14 - cable equalizer.
The parking brake parts are installed in the reverse order of removal, followed by brake adjustment (see sect. «Parking brake adjustment»). When installing, lubricate with Litol-24 grease the axis of the parking brake lever, the front and rear ends of the cable and the connecting pin of the thrust. Make sure that the shoulder of the rear tip of the cable sheath fits snugly against the brake shield.
Checking details
Carefully check the condition of the parking brake parts. If a break, abrasion of the wires of the cable, poor fastening of the tips on it or damage to the sheath are found, the cable is replaced with a new one. Make sure that the teeth of the sector and the latches are not damaged and the lever is securely fixed in a given position, and also easily moves up and down.
Damaged and worn parts are replaced.
